Folks, Commander Vai has this new Legacy Drive pedal for those into his tone & tube lovers alike. Yes, a 12AX7 tube is in there for em, tube-likeness 😜 My personal experience with tube-equipped pedals- they aren't quite like what they are in amps. Some of them are next to awful. Regardless, here's the Commander himself playing through the Legacy Drive & you just might agree with me that this is one of the worst playing by him:
Labels
ALBUM REVIEW
CD REVIEW
CULTURE
GUITAR
GUITAR ACCESSORISE
GUITAR BLOG
GUITAR NEWS
LEARN GUITAR
MUSIC NEWS
NEWS
Showing posts with label GUITAR ACCESSORISE. Show all posts
Saturday, February 18, 2017
Legacy drive
Monday, January 23, 2017
Mod Garage: Four Ways to Configure a 4-Conductor Humbucker
Fig. 1 — illustration courtesy of singlecoil.com
This month we’re going to explore four ways to configure any humbucker that has 4-conductor wiring. (Note: These wiring schemes are not intended for an old-school humbucker with 2-conductor wiring, but rather the modern humbucker that allows coil-splitting and other wiring mods.)
For starters, let’s review our terminology. Looking at a humbucker from the front, we call the lower coil “south” and the upper coil “north.” The south coil is always the “screw side,” while the north coil is the “slug side.” The latter is named for the type of magnetic material used on this coil. Each coil is wrapped with very fine wire, and this wire has a start and a finish. This results in a total of five wires coming from the humbucker:
• North coil start plus north coil finish.
• South coil start plus south coil finish.
• Ground.
The bare wire or braided shield always goes to ground—there’s no exception—so that leaves us with four wires to play with. Having access to the start and finish of each coil wire not only makes it easy to solve potential out-of-phase issues (a subject we’ll cover in another column), but it also gives you the option to wire up your humbucker in one of four different ways. If you’re ambitious, you can use a switch to put several options at your fingertips.
The south coil is always the “screw side,” while the north coil
is the “slug side.”
Every pickup company uses its own color-code scheme for these four wires. This makes discussing humbucker wiring a little more confusing than necessary, but that’s the way it is. As usual, I’ll use the Seymour Duncan color code as a quasi-standard. You should be able to get color-code information for your pickups from their maker, and there are several charts available on the internet that let you compare color-code schemes from different manufacturers. You can use such charts to translate the following wirings into whatever color code corresponds to your particular brand of humbucker. Fortunately that’s not too hard—you only need to know which color wire on your pickup indicates the start or finish of which coil. Once you have that info, you can draw up a reference chart to decode this column’s wirings.
Here’s the Seymour Duncan 4-conductor humbucker color code:
• North coil start is black; north coil finish is white.
• South coil start is green; south coil finish is red.
• Ground is bare wire.
Fig. 1 sums up what we’ve covered so far in the Seymour Duncan format. Now let’s walk through the four ways you can wire up a humbucker. Ready?
Standard humbucker wiring: both coils connected in series. This is the default wiring in almost every guitar loaded with one or more humbuckers because it produces a warm, fat tone with maximum output while offering hum-cancelling capability. (It’s also the factory standard for all humbuckers with 2-conductor wiring consisting of only hot and ground.)
Fig. 2 — illustration courtesy of singlecoil.com
Here are the connections for series wiring (Fig. 2):
• North coil start is the hot output.
• North coil finish and south coil finish are soldered together and taped off (this is the series link).
• South coil start is soldered together with the bare wire going to ground.
“Single-coil” humbucker wiring: both coils connected in parallel. This option gives you a single-coil-like tone, but still retains hum-cancelling capability. It doesn’t deliver a crystal-clear Strat or Tele tone, but to my ears it at least resembles a single-coil pickup—maybe closer to a P-90 than to a standard single-coil. Every type of humbucker sounds a little different when wired this way, so it’s simply a matter of giving it a try to determine if you like the sound.
Fig. 3 — illustration courtesy of singlecoil.com
Parallel wiring (Fig. 3) requires the following connections:
• North coil start and south coil finish are soldered together as the hot output.
• North coil finish and south coil start are soldered together with the bare ground wire.
Coil-splitting humbucker wiring #1: splitting to the south coil. This wiring splits the humbucker in half, shunting one coil to ground and leaving the other coil engaged like a true single-coil pickup. In this mode, the hum-cancelling function is no longer active, so you’ll get the hum and noise of any single-coil pickup. But don’t expect a true Strat or Tele tone: If that’s your goal, investigate the special breed of humbuckers that are made out of two real single-coil pickups. The downside of this type of pickup is that it doesn’t sound great in full humbucker mode, so, as we’re so often reminded, it’s about compromise.
Splitting to the humbucker’s south coil, which is the screw side, is only recommended for neck pickups. (You’ll learn why we’re excluding the bridge pickup when we get to our fourth wiring scheme.) Let’s also remember that in most guitars with neck humbuckers, the south, screw-side coil lies closest to the neck.
Fig. 4 — illustration courtesy of singlecoil.com
For this coil-splitting wiring (Fig. 4), you need the following connections:
• South coil start is the hot output.
• North coil start, north coil finish, and south coil finish are soldered together with the bare ground wire.
Coil-splitting humbucker wiring #2: splitting to the north coil. This wiring follows the same concept as our previous coil-splitting recipe, but leaves the north coil active—that’s the slug side. This version is recommended for a bridge humbucker because pole-piece slugs deliver a fuller sound than pole-piece screws.
Fig. 5 — illustration courtesy of singlecoil.com
Here are the connections for our second coil-splitting wiring (Fig. 5):
• North coil start is the hot output.
• North coil finish, south coil start, and south coil finish are soldered together with the bare ground wire.
Well, that’s it. In a future column we’ll explore how to integrate and control all these options with the help of a switching device. And, of course, we’ll learn how to compensate for possible out-of-phase issues that can occur when you combine several humbuckers or a humbucker with a single-coil. But next month, we’ll dig into a proje
Tuesday, February 9, 2016
7 Rarely Used Pro Tools Features
For those of you who use Pro Tools, you'll enjoy this video by Paul Maunder. It's all about 7 rarely used PT features that could save you a lot of time during your next session. If you use another DAW, you might be able to find a similar function as well.The rarely used features are:
1. Plug-in Settings Auto Increment
2. Restore Last Selection
3. Consolidate Clip 1kHz Tone
4. Rectified & Power Waveform Views
5. Metadata Inspector
6. Slip/Grid Mode
7. Cursor Location Indicator
Very cool. Thanks, Paul!
Saturday, October 24, 2015
Meet The EVH 5150III 15W LBX Head
Aww, look at
this widdle cutie. EVH has squeezed a version of the venerable 5150III into a teensy tiny lunchbox amp that
packs a sonic wallop while being small enough that you could probably carry it
around by biting down on the strap while you carry your guitar case in one hand
and a 2X12 with the other. probably. I don’t know how strong your teeth are.
Here’s some info from the website:
“A mighty sonic
force to be reckoned with, the EVH 5150III 15W LBX is an easy-to-carry
“lunchbox” guitar amp head–but don’t let it’s diminutive size fool you; its
packed to the gills with searing tone! Armed with five ECC83S (12AX7) and two
EL84 tubes for incredible high gain sound, it performs like an arena-filling
champ. Two flexible channels, the famous EVH Blue “Crunch” and Red “Full Burn,”
combine with the familiar low/mid/high/presence tone controls and 1/4–power
switch so you can easily dial-in your own roaring Variac-less “brown” sound.
Dial up a tasty
crunch for rhythm work and then when it’s time for a face-melting solo, stomp
on the included footswitch to call up an intense lead tone with tons of singing
sustain. For colossal tone and serious crunch in a compact package, look no
further than the EVH 5150III 15W LBX!”
Wednesday, May 13, 2015
Boogie in the house (2)
I'm not a MESA fan. Just like I'm not a Gibson fan, I make it a point to own a Gibson (& then some) in appreciation of guitar workmanship & tone philosophy. I bought the Mark V 25 here because it's the most likable tone in my books & acknowledge the fact that it's one of the landmark amp tones out there in terms of drive/distortion. I also like the fact that it says 'Boogie' there instead of 'MESA' so I believe I'm not drawn to hype but more to functionality & tone. If the Mark V 25 isn't available in this smaller construction, I wouldn't have bothered. Whatever Rectifier models came thereafter, they simply failed to draw me to whatever believable American-esque tone there is to behold; I'm just not a fan of this kind of voicing. Don't remind me the fact that some of the most commercially celebrated bands out there had their tones made by a MESA rectifier of some incarnations, I'm not obliged to tread their paths.
Sunday, May 10, 2015
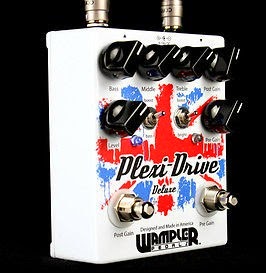
Wampler: Plexi Drive Deluxe
Two days ago, I tried this pedal; it's Wampler's Plexi-Drive Deluxe.
It's a deluxe version by virtue of an added pre-gain feature that boosts
the primary signals in addition to being an independent boost function.
This means, you can activate the pre-gain function even if you have the
primary channel in 'off' mode. The catch is, that solitary pre-gain
button is wired exclusive to the primary/ post-gain channel so all the 4
knobs above it have no controls over the pre-gain feature. Once you
activate the pre-gain button, you only have the pre-gain knob to deal
with.
The good thing
This works very much like having a Tube Screamer or any other light-type
overdrive hooked onto your primary drive/distortion source: Guitar into
boost drive into main drive into amp. That's putting it crudely. If we
connect our pedals this way, we know that our boost drive (ie. the
pre-gain push) would have zero influence in terms of EQ once the main
drive is activated because the main drive's 'more powerful' being would
reduce the pre-amp's function to supplementary status. That's how the
pre-gain feature in the Plex-Drive Deluxe works; it's job is to boost
gain by virtue of saturation, everything else doesn't matter.
The not so good thing
Thank you Wampler for making it as simple as it is but for the price we
are paying ($345), having some other controls manipulating the pre-amp
feature would be splendid. This means, we can further sculpt our tone
without having to add another pedal to the set up. Also, we know of many
2-pedal combinations which lies below the $345 mark.
On hindsight, the manufacturer would want the Plexi-Drive Deluxe to work
this way because this is the most accurate way to manifest the tone of
an amp with a boost drive in the pre-gain stage. I prefer the PDD's
overall tone with both features activated- saturated drive with lots of
picking dynamics complement. If you are not a Marshall fan, all this
might sound over-rated to you because you can get away with a similar
tone using other pedals for less money. If you know what 'Wampler' has
to offer, this one is a very convincing reproduction.
Thanks to the good people at SV Guitars for the warm accommodations.
Tuesday, May 5, 2015
Pedal-ing
Some amps out there sound more awesome given a little boost in terms of
drive. In this aspect, we are looking at connecting drive/distortion
pedals either through the conventional guitar-pedal-amp set up or
letting them work some magic through the FX loop. Nobody should tell you
how you should be connecting them, it's what works for you.
I've been revisiting my Marshall JCM 800, was happy with a Tube Screamer
in the FX chain but upon close listening, this didn't quite increase
the amp's ferocity. The Tube Screamer increased some cream factor in
there but the amp could be edgier in terms of drive. So out came some
distortion pedals: BOSS DS-1, EHX Metal Muff, Montreux Knebworth &
One Control Anodized Brown Distortion. The JCM 800 simply prefers a
growling distortion that does not overpower its own voicing & my One
Control Anodized Brown distortion was it. In addition to more growl, I
could still hear the Marshall tone in there. If it is flipped to sound
otherwise, then what's the point of having a Marshall to begin with.
Sometimes, it's easy to overlook a preferred set up simply because we
embrace a certain hype pertaining to a tried & tested formula of
matching a certain amp to a particular drive pedal (Oh, man you gotta
try a Twin Reverb with a Tube Screamer- sounds familiar to you?). Do ask
yourselves, first & foremost if that adventure was yours to begin
with. There is nothing wrong with emulating a well-known set up of a
certain guitar icon but do keep things objective. If it doesn't work for
you then you have no obligations to embrace it.
Saturday, May 2, 2015
Gravity's gold
Gravity picks has the new Gold series for fans who wish to move away from the acrylic offerings. There's no gold elements involved here at all, just the manufacturer's take on thermoplastic plus an in-house beveling system for precision cuts. Together with the laser-engraved details, it'll set you back a good USD29 for one.
Thursday, April 16, 2015
Wah... Boss!
Wednesday, April 15, 2015
Smooth options
These pedals are rather fresh. Both are signature products & they are treading the same path, one which serves great smoothness in drive voicings powered by a 2-in-1 concept.
The Wampler Dual Fusion is a complex beast. There are subtle controls here that would alter your tone rather drastically especially at higher volume settings. It is able to manifest an 'alternative' arrangement akin to switching the positions of two pedals aligned in series. Marvelous.
The JRockett Allan Holdsworth pedal is no wimp when it comes to drive intensity as well but it works on a slightly different note; one of its channel is a booster unit as opposed to the Wampler's double drive serving. The immediate advantage here is that the booster unit doesn't temper with your tone drastically, instead, it supplements your gain concerns. Awesome.
I've been meddling with both pedals individually because an inital hook up just manifested too much gain to such an extent it becomes a very fuzzy affair, something I'm not too keen with. Both pedals are menacing when it comes to that smooth fusion tone so these specialists are singular in their performances in this aspect, it's not quite as good for anything else for that matter. If you think you need some inspiration for your legato techniques, do check them out.
Building a Bazz Fuss fuzz pedal
Hey, what should we do today? How about making a fuzz pedal?
Cool, I knew you were up for it.
As you may be aware, I’ve recently been helping my friend Adam with a few guitar projects and he was keen to get started on pedal making (specifically a fuzz pedal). I suggested the Bazz Fuss as an easy starter project. It’s only 5 components (and a pot) and it sounds good too. It's designed primarily for a bass guitar, but it sounds great with a normal guitar too.
Here it is (note that I laid mine out slightly differently, and I eventually swapped the 10k resistor for a 100k one):
Since I hadn’t already made a Bazz Fuss myself, I decided it might be fun to do so. Apart from having one for myself, it would be handy to have one to refer to if Adam ran into any issues while he made his.
I decided to challenge myself a bit and see if I could fit it into a Hammond 1590A enclosure. They’re pretty hard to find round these parts, but I did manage to find one that had almost the same dimensions. In fact it’s slightly tighter than a 1590A, but hey, that’s just part of the fun, amirite?
Just for reference, a Hammond 1590A enclosure measures 93 mm x 39 mm x 27 mm. Mine measures 90 mm x 36 mm x 30 mm. The walls are a bit thicker and there are some extra bits inside which will make it even more cramped.
Here’s the enclosure in question:
And here’s the inside. You can see some additional metal in there that you would ordinarily screw a ground screw into, as well as some circuit board slots (which I won’t be using).
Here’s a bit of a test fitting just to see if I can even get the main mechanical parts in there:
The answer is “just about”. So we start drilling very carefully.
First the switch:
Then the first jack:
Second jack in place:
I’m testing the jacks with something plugged in, just to make sure I can still do that without any contacts banging up against anything they shouldn’t. In a normal-sized enclosure this would be less of an issue, but things are very close together in here.
Next to go in is the DC-in jack, since there’s really not much flexibility there. Once that’s done we’ll be able to see what space is left for the pot and the circuit.
OK, the pot can just about fit in here, with the legs bent up (in fact I ended up cutting off parts of the legs to help them fit).
Just one more item and that’s the LED. I decided to go with a smaller 3 mm LED. And I also decided to make use of one of the little grounding threaded holes I mentioned earlier.
This (little) one, which I drill all the way through so the LED can sit in it:
Here’s how that looks from the front:
And we’re done (apart from the circuit and wiring of course):
Here’s how THAT looks from the outside:
When you’re trying to fit a circuit into something this small you really have to think about how big your circuit board can be and still physically fit. Not only that, but things like whether the capacitors can sit vertically without hitting the back of the enclosure (they couldn’t, which is why they’re lying flat).
Anyway here’s the board done, and wired to the pot:
I stick some insulating material between the pot and the board so there are no short-circuits:
Before we wire this up, I’m going to paint the enclosure. How about blue?
And here it is wired up. Not the easiest pedal wiring job I’ve ever done.
I’ve put some insulating tape anywhere where there was a danger that something might touch something it shouldn’t, and that included the inside of the back cover.
Finally it’s time to put it together.
The first time I tried it out, it sounded bad. It worked, but not well. I replaced the 10k resistor with a 100k one and it sounds great now. You may want to do the same.
Subscribe to:
Posts (Atom)